|
The Elizabethan Seam
Sewing by hand effectively, strongly, elegantly
Laura Mellin, June 2007
|
One of the things that constantly comes to light when examining extant Elizabethan clothing is the skill with which the maker of the garment created such mundane things as seams and hems. Beyond the admittedly glorious embroidery for which the period is known, a smaller, quieter grace can be found in the exquisite needlework that was probably never given a second thought by its creators.
Part of the equation is the delicacy of the linen itself; fine quality linen from Flanders could be 150 or more threads per inch, and whisper fine like voile, or the heavier grades, 80-100 t.p.i., fine, but strong enough to make shifts and shirts for the Elizabethan body. Such fine threads (most linen available in retail yardage today is ~35-50 t.p.i.) make finer needlework possible, but it is not impossible to recreate the tiny stitches that make these garments remarkable; it's just a matter of asking the right questions and finding the right answers.
|
The most important question should be what stitches did they use? I remember, long ago, being told that the Elizabethans only ever used a straight running stitch to sew their garments together, but I disbelieved it then, even though I knew no more about Elizabethan needlework than the average modern seamstress. Subsequent years of research turned up several different styles of stitches used for construction and finishing work, some before the decorative work, some after. None were limited to just one stitch, though a casual look at the sewn pieces might suggest such a thing.
A lot of people are afraid of hand-sewing, not because of the time involved, but because it seems intimidating. In reality, it is less complicated than machine sewing, as apart from embroidery, there are only a few styles of stitch used over and over again, and they apply to all fabrics. Following the method outlined below, it is possible for even someone who has never hand-sewn anything to produce a sturdy period-style garment with minimum fear.
I suppose the biggest sticking point for people used to working with sewing machines is that the way we put pattern pieces together has changed from 400 years ago. With the advent of serger machines that sew and finish, we have come even further from the manner in which people used to construct clothing. These days, we put two pieces together and sew 1/2-1" in from the edge of the fabric. Back then, each piece was turned and hemmed before the edges were sewn together. Yes, the edges. If the piece was to be lined, the individual pieces would be turned once. If it was unlined, then the fabric would be turned twice if it would fray (like linen, for example).
|
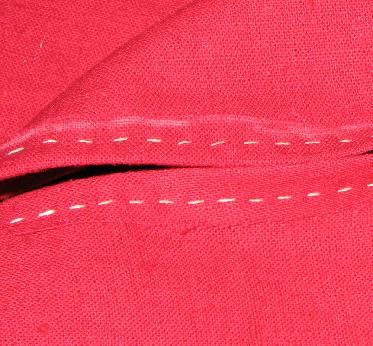
One of the things multiple people have remarked on is how tiny the seaming stitches are on period pieces; they marvel at the miniscule stitches, and declare they cannot do the same, no matter how they try. They are wrong; the tiny stitches are not impossible, but they are done with a different stitch than most people think when they see the seam. Because of modern sewing machines, modern sewers are locked into the idea that seams are done with a running stitch - this isn't necessarily the case. In fact, a running stitch is inferior in staying power and strength to the stitch that looks so tiny - the whip-stitch.
We're used to thinking of a whip-stitch as a basting stitch - large, loose, and easy to pull out. However, when the whip stitch catches only the very edge of the fabric and employs smaller stitches, a remarkable thing happens - a perfect seam.
|
This seam is so strong it rivals machine stitching for strength. The thread is waxed for extra durability and smooth sewing.
These techniques all work best with natural fibers and threads. Most garments were sewn with linen thread of varying thicknesses, though silk garments could also be sewn with waxed silk to prevent damage to the material.
|
How is it done?
1. Lay out each piece and pin/press the sides to be seamed so that they are turned under once for lined fabric, or twice if the edges will be exposed. Stitch down the turned edges using a simple running stitch. Make the stitches as small as possible so that the outer side looks neat (the stitching will always show, but it’s okay – it did back then, too).
NOTE: Always use a decent seam allowance – ˝ to ľ”. If you don’t, the fabric will start to fray, and weaken the stitching. If the fabric is turned under twice, stitch the running stitch at the edge of the turn; if turned once, stitch Ľ” in from the raw edge.
|
2. Place the finished edges right sides together, and whip stitch the edges together. Try to go no further in than a couple of millimeters – the less fabric bunched up by the stitching, the better.
|
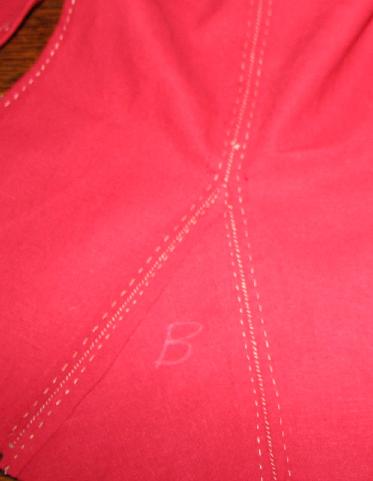
3. Gently pull the two stitched pieces apart so that the whip-stitched seam lies flat. Some fabrics may require pressing to get perfectly flat but most will not.
It’s that simple!
|
|
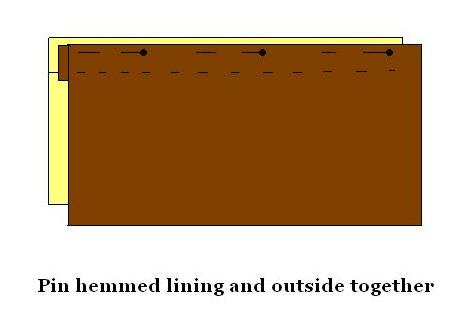
The trick for attaching the edge of the lining to the fabric is a little different: Pin the lining and fabric shell together right sides out with the edges turned in (you may find this easier if you iron the turned edges before pinning them together).
|
|
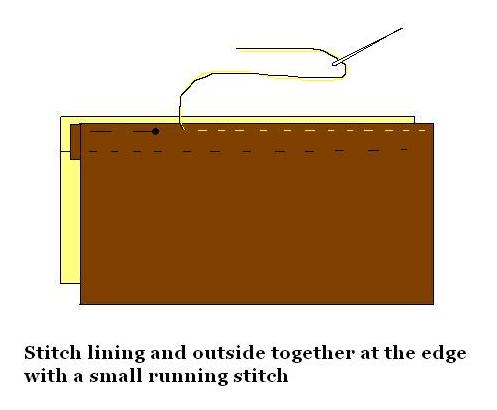
Then stitch the lining and shell together at the very edge using a small running stitch (don’t push the needle through two stitches; go up and down so as to make the stitches as small as possible).
|
|
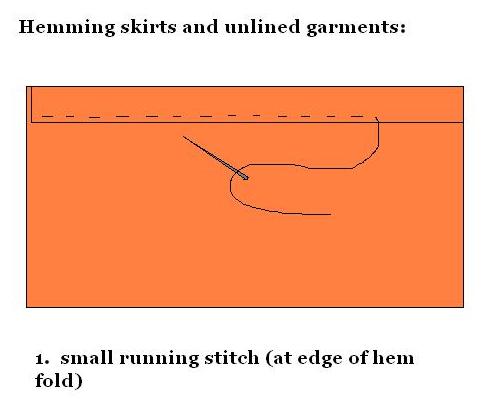
For hems, you have a choice: You can either do a small running stitch like the seamed edges:
|
|
…or you can do a very shallow whip stitch that is barely angled and picks up very little of the fabric on each stitch:
|
I have found examples of both styles on garments in the Victoria & Albert Museum, London.
Using these techniques, it’s possible to sew any kind of seam – curved, shaped, flat – and the finished garment will fit without any ripples from strained seams or clipping on curved seams (which weakens the fabric).
If you are going to take the time to hand sew a garment, it's worth doing it in the most effective way possible; your garment will last longer, fit better, and be much stronger under stress. I've used these techniques on multiple garments, and not only do they fit better, the sewing actually goes faster. Next time you decide to go all out on your hand sewing, give it a try!
|
|